To monitor your AWS account, Piezopy needs read-only access to your billing data. You grant this by creating an IAM role in your AWS account that trusts Piezopy’s account.
This page assumes you have already signed up and logged in. From the dashboard, open the Accounts menu, click Add Account, and fill in your 12-digit AWS account ID and a nickname. After you submit the form, the dashboard displays the IAM Role Setup Guide — that’s where the three options below come in.
Pick the option that matches how you manage your AWS infrastructure:
- CDK construct — recommended if you already use AWS CDK.
- Manual setup — click through the AWS IAM console.
- Validate only — if the role is already in place and you just need to confirm permissions.
Option 1 — CDK construct (recommended)
If your infrastructure is managed with AWS CDK, install our published construct and add it to a stack you already deploy.
1. Install the package
npm install @pyriter/piezopy-iam-role2. Add to your stack
import { PiezopyDashboardIamRole } from '@pyriter/piezopy-iam-role';

// Inside your stack constructor
new PiezopyDashboardIamRole(this, 'PyriterDashboardRole', {
  shouldCreate: true, // optional, defaults to true
});
3. Deploy
List your available stacks:
cdk listThen deploy the stack containing the new role:
cdk deploy MyAppStack4. Validate
Once the stack deploys successfully, return to the Piezopy dashboard and click Check Account Permissions to confirm the role is reachable.
Option 2 — Manual setup
If you don’t use CDK, you can create the role by hand in the AWS console. The whole flow takes about five minutes.
1. Open the IAM console
- Sign in to your AWS Console.
- Go to the IAM service.
- Select Roles from the left navigation.
- Click Create role.

2. Choose “AWS account” as trusted entity
Select AWS account as the trusted entity type:
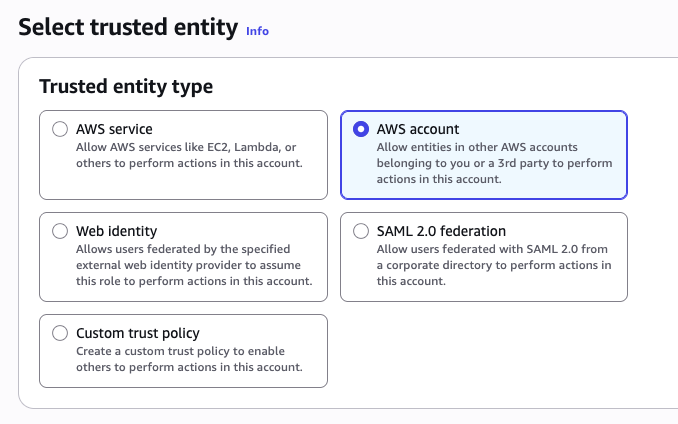
Choose Another AWS account and enter Piezopy’s account ID:
861276101356
Click Next.
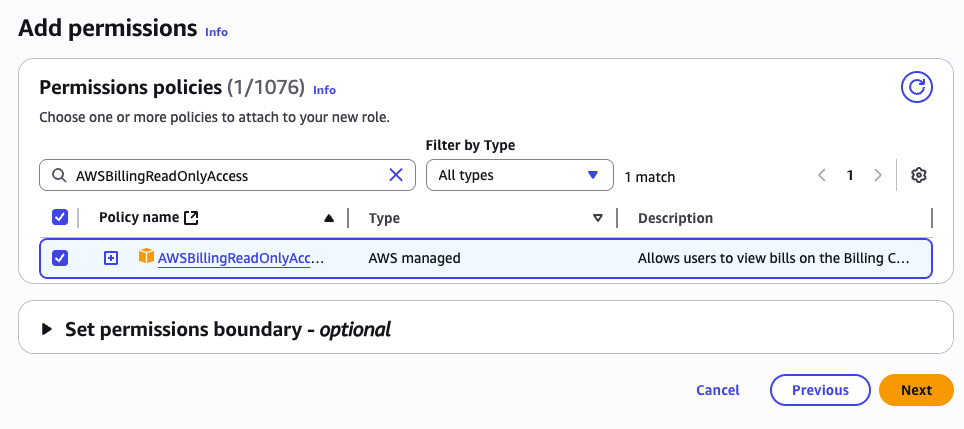
3. Attach the read-only billing policy
Search for and attach the AWS managed policy:
AWSBillingReadOnlyAccessSelect the policy, then click Next.
4. Name the role
Use exactly this name (Piezopy looks it up by name):
PIEZOPY_DASHBOARD_DO_NOT_DELETE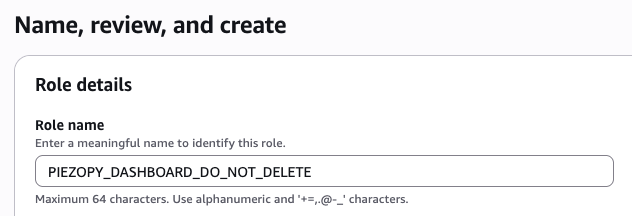
Click Create role to finish.
5. Validate
Return to the Piezopy dashboard and click Check Account Permissions to confirm the role is reachable.
Option 3 — Validate only
If the role already exists in your AWS account (for example, you set it up previously or another teammate created it), you don’t need to repeat the setup. Open the Piezopy dashboard, find the AWS account in the list, and click Check Account Permissions.
The dashboard will:
- Attempt to assume the role
PIEZOPY_DASHBOARD_DO_NOT_DELETEin your account. - Verify it has
AWSBillingReadOnlyAccess(or equivalent) attached. - Update the account’s permission status accordingly.
If validation fails, the dashboard displays the specific failure reason — most commonly a missing role, a missing policy, or a trust policy that doesn’t allow Piezopy’s account ID (861276101356) to assume the role.
Trust policy reference
For both setup options, the role must trust Piezopy’s AWS account. The CDK construct configures this for you. If you’re setting it up manually or need to verify, the trust policy looks like this:
{
  "Version": "2012-10-17",
  "Statement": [
    {
      "Effect": "Allow",
      "Principal": {
        "AWS": "arn:aws:iam::861276101356:root"
      },
      "Action": "sts:AssumeRole"
    }
  ]
}
Need help?
If validation keeps failing or you hit something not covered here, contact us and include your AWS account ID and the error message shown in the dashboard.